Ever had to manage a lot of different assets in one photoshop file, like for a webpage. Or for designing 200 web-banners. And then had to save it out? Glad that photoshop has that slice tool, right? Oh wait, that button needs to be a bit higher. Can we have a few other button variants? Rats, back to correcting slices. Ok, let's use Layer Comps. For, lets's say, 60 files? Well, I'd rather not. Besides... one change and needing to clear warning flags and updating comps. Not for a task like this. Most tasks you come across will have you manually saving and updating files. And this is costing time. A lot of time. Hours of time literally, sometimes. I hate tasks like this, and so do you, I suppose. So I wen't down the Photoshop Scripting road to come up with something better. This suite of four scripts will help you with your daily task of saving and naming files.
Overview
Included are four scripts. Three of them will allow you saving your currently active document to a specific format with the press of a button. If the file already exists, numbers will be appended in the filename. What's this useful for? Quickly saving files as PNG or JPG, or quickly comping layers without having to setup layer comps. Fast and easy. The other script is by far more powerful. It will collect all layers and layersets that live under a specifically named layerset in photoshop and make a new file out of each of them. They can optionally be prefixed with the filename, saved to the current or the parent directory and cropped in a number of ways. Design your asset shets the way you want. Place assets where you want in your document. It doesn't matter. They'll be exported just fine. Sounds interesting? It should. THis cript has already saved me A METRICAL TON of time. I use it nearly every day.
Installing Script files
If you are a PS Pro and already installed your share of scripts etc. for Photoshop, please feel free to skip this section. For anybody else, please read on. Installing scriptfiles in PS is really easy. But first, let's take a look on what's in the package.
Scriptfiles (./scripts)
- ExportImageFootageFromLayers.jsx
- SaveJPG.jsx
- SavePNG.jsx
- SaveTGA.jsx
Actions (./actions)
- visionvortex productivity - export.atn
Demo File (./demo)
- visionvortex-productivity-export.psd
First let's install the scripts. PS automatically finds all scripts in it's program path. I do recommend to choose another location for your scripts though. For one, the program path might be protected so you cannot access it. Sysadmins like to do this to keep users from meddling with the stuff there. Another reason is to keep ypur scripts photoshop version independent. When PS gets a major new version, all its program and settings paths change. You'll need to move all presets and scripts AND recreate your actions that point to those scripts. So, to make things easy for you (if you are on windows... Sorry Mac ;_;), just create a new folder C:\PhotoshopScripts and place your scripts there. This might also not be what you want. Also a good place for your scripts to be is your cloud storage folder. However, if you choose the C: path, you'll be happy to hear that I already created the content actions for PS for you. So you'll only have to...
Load or Create the Actions
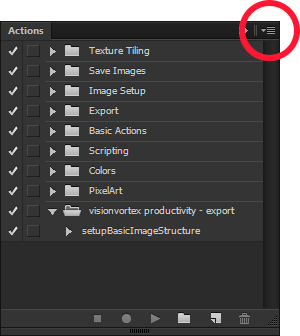
click on the upper right arrow symbol
In order to not to have to browse for the scripts every time you need them (that would defeat the whole purpose of the exercise) you'll need content actions. Those reside in the actions palette (Window > Actions). Open the palette. If the palette is in Button mode, you can access the palette options by clicking on the small button in the top right corner. Look for the entry called "Button Mode" and klick it once. Your actions palette should now look somewhat like in the image (You'll have different action sets there). Now klick top-right again and look for "Load Actions..." and klick it. Browse for the .atn file that is included with the package and select it. You'll now have the default actions set up. They all point to the scripts located under C:/PhotoshopScripts. If you displike your scripts living there, you'll need to create your own actions.

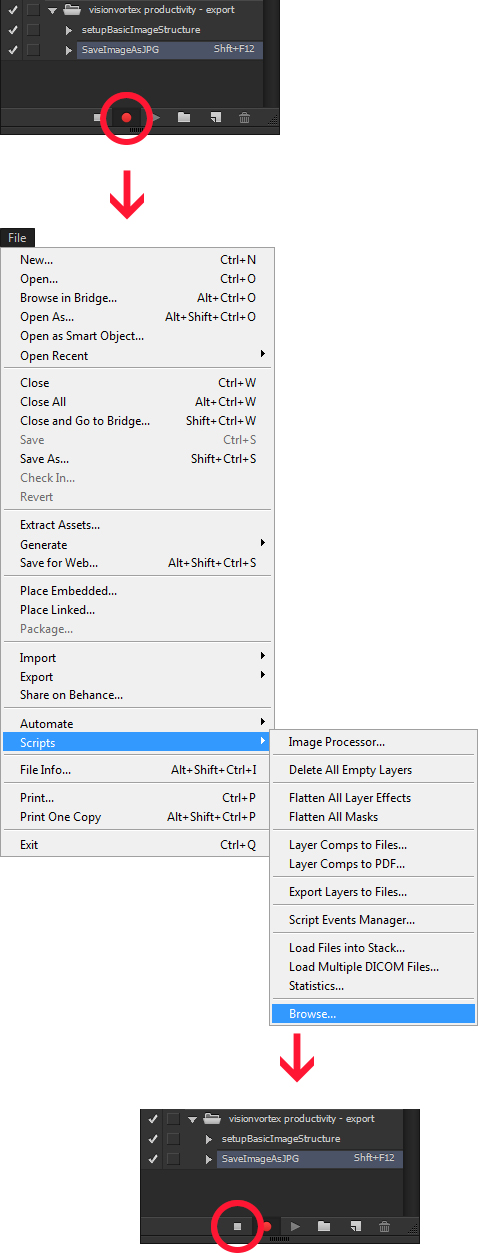
Make sure the right action set is selected. Press the small paper symbol. A popup will... er.. pop up. Just fill in a name for the script and choose a shortccut. I personally use plain F12, F11 and F10 for the saveAs... scripts, Nut I don't use a shortcut for the Export script. But you might choose whatever you want. The color attribute will color the button in Button mode accordingly. I find this feature useful. But if you are the grey only in interfaces type of person... you know... whatever works for you ;D After pressing OK the new (and empty action appears in the palette). Now select this action and press the record button. After that browse for your script via File > Scripts > Browse... select the script and press ok. Now the script will be executed. Please note, that, if the script fails, the action won't be recorded. So please make sure that you have a file open. Otherwise the script will terminate with an appropriate error. If you don't have a file available (Yeah, I know. But it might be... ) you can use the demo PSD from the package. If the script is executed sucessfully, press the stop button. Don't forget that or PS will faithfully record EVERYTHING YOU DO. If the operation was successful you'll have your action available and the shortcut displayed at the right.
If this description didn't work for you, there are a TON of really good tutorials on this task. Just use Google or ask me on twitter.
Save image as JPG/PNG/TGA
These scripts work straightforward. If you have a file open and execute on of the scripts, the current document will be saved as a copy with the respective file format in the current state. The file name will be the same as the open document. The file will be saved to the same directory If a file with that name already exists, there will be added a suffix _# where # is just a number. Easy. These scripts work great when you are just saving images for presentations or pushing stuff to your social media platform of choice. No "Save As..." and typing around.
Export Image Footage from Layers
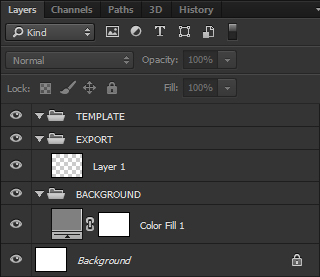
This script is a bit more complex to explain but a blast to use and simple to understand. It basically takes every LayerSet (Folder) and ArtLayer of the active Photoshop document that resides in a toplevel LayerSet that is called EXPORT (All caps. Mind you.) and saves them to single files. I do a certain setup in my files that works out greatly. Your working-files should look something like shown in the image. To make things really convenient, there is an action called setupBasicImageStructure included with the package that will generate that setup for any file with the press of a button. I tend to erase the background layer afterwards. but you can as well leave it there. It doesn't hurt. Whatever is placed outside of the EXPORT LayerSet won't be exported. Grids, templates, guides, annotations? Put all of these either in the template or the background set. If you want to see how a fully packed file looks like, take a look at the demo PSD that is provided with the package.
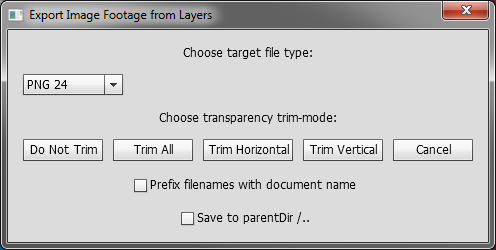
Now you are good to go. Start working! When you arrive at the point where you want your footage separated into the final files... press the action button that fires the exportImageFootageFromLayers script that you created earlier. The Script UI should look like on the image. Let's go through the options.
File Type
Here you can choose from a number of options. As for JPG three is only the full quality option available. I didn't have time to implement a slider yet. Perhaps i'll be adding this feature in the future.
Trim-Mode Options
These options are quite important. Once you Click on one of them, the process will be started (or the operation will be cancelled). On Export the document can either be exported in it's original size. If you want' that you can choose Do Not Trim. Most of the time this is not what you will desire. In this case, you can choose for a number of options. Trim All trims all available transparent space of the export object (LayerSet or ArtLayer), Trim Horizontal will trim all available transparent space hoizontally, Trim Vertical will do the same for vertical space. Cancel will terminate the script without doing anything.
File Name Options
The upper option will prefix all output documents with the file name of the root document. The filename will look like rootDocumentName_exportObjectName.fileTypeExtension. If you select the Save to parent directory /.. option, the files will not be saved into the same folder but in the parent level folder. This is useful if you want to keep your PSD separate from the output files (like for webpages.This way you don't have to select which files to upload on the webserver. Just select all and upload. The PSDs are safely tucked away in their own folder).
Download
License
The contents of this package are licensed under:

Visionvortex Productivity Scripts - Expot by Richard Schmidbauer (visionvortex) is licensed under a Creative Commons Attribution-ShareAlike 4.0 International License.
Based on a work at http://www.visionvortex.de.
Permissions beyond the scope of this license may be available at http://www.visionvortex.de/ps-productivity-package-export.
